Sunday, May 19, 2013

Web based AVR Project


          This AVR Project is derived from the idea to control home appliances through web. It is a combination of web application and avr circuit. This project consist  python(flask frame work ) as server and JavaScript with HTML5 as client. The User Interface and avr microcontroller is communicate through serial port of PC.

CIRCUIT DIAGRAM


Circuit is divided into two parts, microcontroller-circuit and serial port interface.

The main circuit consist of atmega8 microcontroller, four leds connected to PORTD (pins-6,11,12,13) and a potentiometer in pin-23(ADC0).The MAX232 used as level converter for communicating the USART of atmega8 with serial port(PC).USART is simply a form of serial data communication.


main circuit


Microcontroller and PC communication using RS232: RS232 is the encoded version of USART.


serial port interface


  This blog post updating now....


Saturday, May 18, 2013

USBasp programmer with avrdude(Linux)


    After success full  implementation of  serial programmer, I turned to make a USBasp programmer .The firmware is downloaded from USBasp official site.In this tutorial we will see how to use AVRdude for burning hex files into AVR microcontroller using USBasp. USBasp is a USB in-circuit programmer for Atmel AVR controllers. It simply consists of an ATMega8 and a couple of passive components. The programmer uses a firmware-only USB driver, no special USB controller is needed. In my circuit only use the six pins(MOSI,MISO,SCK,RESET,GND,+5V) from the usbasp to target microcontroller, It is little different from actual circuit in official site. No need of external +5V power supply to target microcontroller. The circuit is given below


USBasp programmer

NOTE:The fuse bits for 12Mhz crystal  HFUSE=0xc9 and  LFUSE=0xef  burn explicitly to  atmega8 using serial programmer(any programmer).It is very important, the USBasp programmer cannot work with default fuse bits. The command for setting the fuse bit:

avrdude -c ponyser -p m8 -P /dev/ttyS0 -U lfuse:w:0xc9:m -U hfuse:w:0xef:m

For reading the current fuse bit in atmega8:

avrdude -c ponyser -p m8 -P /dev/ttyS0 -U hfuse:r:high.bin:b -U lfuse:r:low.bin:b

Friday, May 17, 2013

AVR Serial Programmer

First I think, how to build a USBasp programmer.But I have n't a usb programmer to flash the firmware to it. Then decided to create a serial programmer and flash the firmware through this programmer to  atmega8. My  AVR serial programmer will transform hex file to most AVR microcontroller. It can build using few readily  available components. This programmer is compatible with popular avrdude software or PonyProg software.

We will be using the serial port for burning. First, we have to develop a burning circuit for it.

REQUIRED COMPONENTS 


Resistors :             10k     - 2
                           4.7k    - 2
                           15k     - 1

Zener diode :         5.1v   - 2


Diode :               1N4148 - 1


Transistor :      BC549/48 -  1


9-PIN RS232 female connector

serial programmer

Monday, April 8, 2013

Unit testing with nose Framework

         Unit testing is a software development process in which the smallest testable parts of an application, called units, are individually and independently tested for proper operation. Unit testing of software applications is done during the development (coding) of an application. Proper unit testing done during the development stage saves both time and money in the end. Unit tests find problems early in the development cycle. Some programming languages directly support unit testing, like Python, java etc. There are a couple of ways to integrate unit tests into your development style. These include Test Driven Development, where unit tests are written prior to the functionality they're testing; during refactoring, where existing code -- sometimes code without any automated tests to start with -- is retrofitted with unit tests as part of the refactoring process; bug fix testing, where bugs are first pinpointed by a targetted test and then fixed; and straight test enhanced development, where tests are written organically as the code evolves. In the end, I think it matters more that you're writing unit tests than it does exactly how you write them.For me, the most important part of having unit tests is that they can be run quickly, easily, and without any thought by developers.

nose

There are many unit test frameworks in Python, and more arise every day. I personally use nose, and it fits my needs fairly well. nose is simpler Unit Testing Framework for python. nose extends unit test to make testing easier. nose comes with a number of builtin plugins to help you with output capture, error introspection, code coverage, doctests, and more. It also comes with plugin hooks for loading, running, watching and reporting on tests and test runs.

Installation

Please refer the nose 1.3.0 documentation for installation of nose on Unix like systems.

simple examples:

Now let's start with a few examples. Here's the simplest nose test you can write:


def test_a():
      assert 'a' == 'a'

Put this in a file called 'test_me.py', and then run nosetest. You will see this output:
.
----------------------------------------------------------------------
Ran 1 test in 0.002s

OK

If you want to see exactly what test was run, you can use nosetest -v

test_me.test_a ... ok

----------------------------------------------------------------------
Ran 1 test in 0.002s

OK

A fairly common pattern for unit tests is something like this:


def test():
   setup_test()
   try:
      do_test()
      make_test_assertions()
   finally:
      cleanup_after_test()
Here, setup_test is a function that creates necessary objects, opens database connections, finds files, etc.Then do_test and make_test_assertions acually run the test code and check to see that the test completed successfully.Finally, the preconditions are cleaned up.


test discovery and execution

nose is a unit test discovery and execution package. Before it can execute any tests, it needs to discover them. nose has a set of rules for discovering tests, and then a fixed protocol for running them. While both can be modified by plugins, for the moment let's consider only the default rules.nose only looks for tests under the working directory, unless you specify one with the -w command line option.nose can only execute tests that it finds. If you're creating a new test suite, it's relatively easy to make sure that nose finds all your tests.


nose command line

Apart from the plugins, there are only a few options that I use regularly.

-w: Specifying the working directory
nose only looks for tests in one place. The -w flag lets you specify that location; e.g. nosetests -w my_nose_test/.  will run only those tests in the directory "/my_nose_test/"
As of the latest development version you can specify multiple working directories on the command line:
nosetests -w nose_test/ -w sample/

-s: Not capturing stdout
By default, nose captures all output and only presents stdout from tests that fail. By specifying '-s', you can turn this behavior off.

-v: Info and debugging output
nose is intentionally pretty terse. If you want to see what tests are being run, use '-v'.

-p: plugins
Output list of available plugins and exit. Combine with higher verbosity for greater detail

Tools for testing

           nose.tools provides a few convenience functions to make writing tests easier. You don’t have to use them; nothing in the rest of nose depends on any of these methods.

nose.tools.ok_(expr, msg=None)
Shorthand for assert. Saves 3 whole characters!

nose.tools.eq_(a, b, msg=None)
Shorthand for ‘assert a == b, “%r != %r” % (a, b)

nose.tools.make_decorator(func)
Wraps a test decorator so as to properly replicate metadata of the decorated function, including nose’s additional stuff (namely, setup and teardown).

nose.tools.raises(*exceptions)
Test must raise one of expected exceptions to pass.

nose.tools.set_trace()
Call pdb.set_trace in the calling frame, first restoring sys.stdout to the real output stream. Note that sys.stdout is NOT reset to whatever it was before the call once pdb is done!

nose.tools.timed(limit)
Test must finish within specified time limit to pass.

nose.tools.with_setup(setup=None, teardown=None)
Decorator to add setup and/or teardown methods to a test function:

nose.tools.istest(func)
Decorator to mark a function or method as a test

nose.tools.nottest(func)
Decorator to mark a function or method as not a test

Running nose programmatically

nose has a friendly top-level API which makes it accessible to Python programs. You can run nose inside your own code by doing this:


import nose

### configure paths, etc here

nose.run()

### do other stuff here


By default nose will pick up on sys.argv; if you want to pass in your own arguments, use nose.run(argv=args). You can also override the default test collector, test runner, test loader, and environment settings at this level. This makes it convenient to add in certain types of new behavior

For more details please refer the official site.


Friday, March 29, 2013

Graph Colouring

       Now, I am creating a web application, Graph Coloring.The graphs are drowned using nodes and lines. In this Graph Coloring application, the nodes of the graph are colored using different colors for adjacent nodes. My application has two parts, one python script that runs in server and the other, an html file which act as user interface for the users.The html file provides the graphical view representation of my application.This application will be explained in detail, later on.

Graph and Graph Coloring

        Mathematically, a graph is a representation of a set of objects where some pairs of the objects are connected by links. The interconnected objects are represented by mathematical abstractions called vertices, and the links that connect some pairs of vertices are called edges.Vertices are also called nodes or points, and edges are also called lines or arcs.
        In Graph theory, graph coloring is a special case of graph labeling. In its simplest form, it is a way of coloring the vertices of a graph such that no two adjacent vertices share the same color; this is called a vertex coloring.

        Now let's going through the codes.In my application, i have used canvas in html file.Canvas is a rectangular portion or area within the html page, and you can control every pixel in it. The canvas element has several methods for drawing paths, boxes, circles, characters, and adding images. For drawing within the canvas, you should need Javascript. The codes are below.
<canvas id="graph" width="700" height="440" style="border:2px solid #000000;"></canvas>
The above code is used for drawing a canvas in html5. I have choose JavaScript for drawing on canvas.More details on canvas and Javascript are available at: http://www.w3schools.com/html5/html5_canvas.asp. 

       Here in the graph application my aim is use javascript for detecting the mouse movements so that i can get the position of each mouse click. Thus getting the points where mouse is clicked, so that i can draw the vertex and lines. I have assigned different clicks for application, double click for creating a node and two single clicks for drawing a line. My codes for mouse actions are below.

function Point(x,y){
    this.x = x;
    this.y = y;
}

function getMousePos(e){
    var point = new Point(0,0);
    if (e.pageX != undefined && e.pageY != undefined) {
point.x = e.pageX;
point.y = e.pageY;
}
    else{
point.x = e.clientX + document.body.scrollLeft +
document.documentElement.scrollLeft;
point.y = e.clientY + document.body.scrollTop +
document.documentElement.scrollTop;
}

    point.x -= canvas.offsetLeft;
    point.y -= canvas.offsetTop;
    return point;      
}

In the above code, mouse points are returned.the vertex and line are drowned using this points.

function drawcircle(e){
    point=getMousePos(e);
    if(checkNode(point,40)==-1){
Vertex(point,"black");
context.font = "10pt Courier New";
context.fillText(v,point.x+10,point.y-20);
v++;
vertex_list.push(point);
}
    else{ 
        alert("node overlapped");
}
}

function drawline(e){
    var point = getMousePos(e);
    var vertex_no=checkNode(point,40);
    if(vertex_no>=0){
if(start_edge==0){
 start_edge=1;
 selected_vertex=vertex_no;
 context.beginPath();
       context.moveTo(vertex_list[vertex_no].x, vertex_list[vertex_no].y);
}
else{
 start_edge=0;
          if(adj_list[selected_vertex]==undefined)
adj_list[selected_vertex]= new Array();
 if(adj_list[vertex_no]==undefined)
adj_list[vertex_no]= new Array();
 if(selected_vertex!=vertex_no){
adj_list[selected_vertex].push(vertex_no);
adj_list[vertex_no].push(selected_vertex);
 }
 context.lineTo(vertex_list[vertex_no].x,vertex_list[vertex_no].y)
 context.stroke();
 context.closePath(); 
}
}
    else
start_edge=0;
    }

       The functions ‘drawline’ and ‘drawcircle’ gets called when the user clicks, i.e. double or single click, anywhere within the canvas. Its arguments is a MouseEvent object that contains information about where the user clicked. Each functions calls getMousePos(e), where the getMousePos(e) returns the values of mouse coordinates where ever the user clicks within the canvas. The values are returned to a vertex_list.After the values are returned, they are used to draw nodes and lines within the canvas.
       Now for the coloring part, an adjacency list containing the list of nodes is needed for coloring.Since the html file is the client and the adjacency list are sent to the server. For communicating with server, i.e. the python script, jQuery is used.i have used jQuery for sending the adjacent list to the server running the python script where the coloring algorithm is implemented.For more details on jQuery visit http://www.w3schools.com/jquery/default.asp.
The complete the code of Graph coloring application is available at: https://github.com/jaseemkp/Graph-Coloring-Django
You can try the graph coloring application at : http://jastech-graph.herokuapp.com/

Monday, March 25, 2013

MongoDB

           Now Let's going through Simple NoSQL database MongoDB. MongoDB is leading NoSQL database,designed for how we build and run application today. NoSQL is designed for distributed data stores where very large scale of data storing is needed. It is a database system that provides simple lightweight mechanism for storage and retrieval of data.NoSQL has become much popular in the last few years.MongoDB is a general purpose, open-source NoSQL database.
Features of MongoDB:
  • Document data model with dynamic schemas
  • Full, flexible index support and rich queries
  • Auto-Sharding for horizontal scalability
  • Built-in replication for high availability
  • Text search
  • Advanced security
  • Aggregation Framework and MapReduce
  • Large media storage with GridFS
Organizations of all sizes use MongoDB to quickly and easily develop, scale and operate applications. Instead of storing data in rows and columns as one would with a relational database, MongoDB stores a binary form of JSON documents (BSON).

 MongoDB Installation:
      Now let's see how to get started  with MongoDB.This tutorial provide basic installation steps for installing MongoDB on Ubuntu.12.04 Linux system, where we uses  .deb package as the basis of the installation.
Enter the following command to import the 10gen public GPG Key:
sudo apt-key adv --keyserver keyserver.ubuntu.com --recv 7F0CEB10
Create a /etc/apt/sources.list.d/10gen.list file and include the following line for the 10gen repository.
deb http://downloads-distro.mongodb.org/repo/ubuntu-upstart dist 10gen
Now Enter the following command to reload your repository:
sudo apt-get update
Issue the following command to install MongoDB:
sudo apt-get install mongodb-10gen
When this command completes, you have successfully installed MongoDB!
You can start the mongod process by issuing the following command:
sudo service mongodb start
As needed, you may stop the mongod process by issuing the following command:
sudo service mongodb stop
You can connect to your MongoDB instance by issuing the following command at the system prompt:
mongo
This will connect to the database running on the localhost interface by default. For more information please refer the link:http://docs.mongodb.org/manual/tutorial/install-mongodb-on-ubuntu/


pymongo

pymongo is python package index. We prefer pip to install pymongo on python:
pip install pymongo
In Python shell, type the following command to import pymongo package.
import pymongo
To connect to the database, we create a database instance- a connection object by including the following in our python shell.
from pymongo import Connection
connection = Connection()
collection = connection.DB_NAME.COLLECTION_NAME
now we are ready to insert database.
collection.insert({"fruit": "Mango", "color": "Orange"})
The above code snippet is enough for inserting a row(document or BSON document in terms of MongoDB) in the table(collection) collection_name.
For retrieving all the data entered into the collection collection_name,
collection.find()
It's also possible to get the specific item in the collection.
collection.find_one({"color": "Orange",})
Reading all the documents of the specified kind, is by,
collection.find({"color": "Orange", })

for more details please click Here.


for sql to mongoDB convertion also refer the link http://docs.mongodb.org/manual/reference/sql-comparison/


Paint application with MongoDB

Now, I have replaced database of My Paint Application from Sqlite3 to MongoDB. The html front end and javascripts are same.Please refer my earlier post about paint application for more info.I will explain how to connect to database and retrive data from it.


from flask import Flask, render_template, request, redirect
from pymongo import Connection

app = Flask(__name__)


connection = Connection()

collection = connection.paintdb.drawings

@app.route('/', methods=['GET', 'POST'])

def paint():
    if request.method == 'GET':
        all_data = {}
        datas = collection.find()
        for data in datas:
            all_data[data["fname"]] = data["image_data"]
        return render_template('paint.html', py_all= all_data)
    elif request.method == 'POST':
        filename = request.form['fname']
        data = request.form['whole_data']
        collection.insert({"fname":filename, "image_data":data})
        return redirect('/')

if __name__ == '__main__':

   app.run()
from pymango module import class "Connection".It is used to connect with database.Then form a collection(table),named as drawings. Datas are inserted directly into collection. 

The complete code is Here

Wednesday, March 20, 2013

Paint Application Using Flask and Sqlite3


     Now, I have rewritten the paint application in Google AppEngine using Flask framework.The html frontend and javascript are same.Please refer my earlier post about paint application for more info.Instead of google datastore, sqlite3 was used for data storage.I will explain how to connect to database and retrive data from it.


def connect_db():
    return sqlite3.connect('paint.db')

@app.before_request

def before_request():
    g.db = connect_db()
    g.db.execute("CREATE TABLE IF NOT EXISTS drawings(fname string primary key, img_data text)")
@app.after_request
def after_request(response):
    g.db.close()
    return response

First we define a function 'connect_db()' for connecting to database before requesting.Then create a table in database file(paint.db) for storing fname and img_data.


@app.route('/', methods=['GET', 'POST'])
def paint():
    if request.method == 'GET':
        py_all = {}
        all_data = g.db.execute("SELECT * FROM drawings")
        for data in all_data:
            py_all[data[0]] = data[1]
        return render_template('paint.html', py_all= py_all)
    elif request.method == 'POST':
        filename = request.form['fname']
        data = request.form['whole_data']
        g.db.execute("REPLACE INTO drawings(fname, img_data) VALUES (?, ?)", (filename, data));
        g.db.commit()
        return redirect('/')

          In GET method the data executed from database is render to  paint.html file.The data taken from data base is stored in 'py_all' object.When user tries to save the image, server gets a POST request.  the image name and its data are saved into a table using the sqlite3 module available in python. Sqlite3 is a basic database interface available in python.
The code can be found Here

Friday, March 15, 2013

Paint App using javascript and html5

      This is my basic paint application using Javascript and HTML5. This web application consist of tools to draw rectangle and circle with ten colors. HTML5 canvas is used for making the drawing space.Two canvases are used to draw shapes, the real canvas is used to store the shapes and temporary canvas is used for drawing shapes in temporarily . The color picker is made using the table method in html.The application works basically on three mouse events onmousedown, onmouseup and onmousemove.To see it in action Click on the Paint Application Figure :

      The script start drawing once the mousedown and mousemove event occurs and continue until the mousedown event occurs. The method used to draw rectangle and circle are different. For example, to draw a rectangle we need to know the left top coordinate plus the length and breadth of the rectangle.arc method is used to draw circles on canvas. The application also provide the facility to clear the canvas if anything drowned in it. Tools are selects using current_tool function in script.The function Draw is used to Drawing shapes like rectangle or circle in canvas.When we draw a shape, the values of shapes are pushed to Object(named data).

Paint with saving facility:
       This application also provides the facility to save our drawings.This is done by saving values about each object needed to regenerate the same drawing. for example, for a rectangle it would be the type of the object which is "rectangle", its beginning coordinates and end coordinates are saved to regenerate the rectangle.All the shapes are saved in same manner.Different functions are used to Drawing and regenerating same our drawings When we click the save button the data is transferred to the server as a json string where it is stored along with a name provided by the user . Since we have a save feature it is quite easy to implement the edit feature also.Just regenerate the drawing using the data received from the server,make some changes and save it with the same name or a new name ,as the user wishes. JSON is syntax for storing and exchanging text information.
The complete code is available Here.To see it in action Click Here 


Friday, March 8, 2013

Django

    Django  is used to build powerful, dynamic, interesting sites in extremely short time. Django is a valuable member of a new generation web frame work. web frame work provides a programming infrastructure for your applications.Direct way to build a python web app from scratch is to use Common Gateway Interface(CGI).Save the script with .cgi extension .In Django the CGI file is split it over four files(models.py, views.py, urls.py) and an HTML template.The model.py file contains a description of the database table, represented by a Python class.This class is called model. The view.py file contain the logic for the page. The url.py file specifies which view is called for given URL pattern. The HTML template that describes the design of the page.

Installation:

If you are using Linux distribution that includes a package Django. For installing Django in your system use the command:
 sudo apt-get install python-django 
Testing the Django installation: start python interactive interpreter by typing python. If the installation was successful, you should be able to import the module django by typing import django.

Hello World Project  

    Our first goal ,let's create a Web Page that outputs message "Hello World". You can take the first step in developing a Django application by creating a project. A project is collection of settings, including database configuration, Django-specific settings and application-specific settings.
In first step, For creating a project run the command:
django-admin startproject hello
This will create a 'hello' directory in your current directory
hello/
    __init__.py
    manage.py
    settings.py
    urls.py
These files are as follows:
__init__.py: A file required for python to treat the hello directory as a package.
manage.py:  A command-line utility that lets you interact with this Django project in various ways.      
                   Type python manage.py help to get a feel for what it can do.
settings.py: Settings/configuration for this Django project.
urls.py: The URLs for this Django project.

Views

     To display a simple message "Hello World" in browser, change into your project directory hello and create  an empty file views.py. Then add the content into it:
from django.http import HttpResponse

def hello(request):
      return HttpResponse("Hello World!")
Let's step through this code: First we import HttpResponse, which live in django.http module. Next we define the view function called hello. Each view function takes at least one parameter called request. This is an object that contains information about the current Web request that has triggered this view.

URLconf

     To hook a view function to a particular URL we need to tell Django explicitly that we’re activating this view at a particular URL.
 Edit urls.py file as follows:
from django.conf.urls.defaults import *

from hello.views import hello

urlpatterns = patterns('',
           ('^hello/$', hello),
)
The first line imports all objects from the django.conf.urls.defaults module. This includes a function called patterns.Then we imported the hello view from its module – hello/views.py, which translates into hello.views in Python import syntax.Next, calls the function patterns and saves the result into a variable called urlpatterns. We added the line ('^hello/$', hello), to urlpatterns. This line is referred to as a URLpattern. It’s a Python tuple in which the first element is a pattern-matching string and the second element is the view function to use for that pattern.
Now test the code in your local machine using the command:
python manage.py runserver
You will see something like this:
Validating models...

0 errors found.

Django version 1.0, using settings 'hello.settings'
Development server is running at http://127.0.0.1:8000/
Quit the server with CONTROL-C.
Now that it’s running, visit http://127.0.0.1:8000/hello/ with your Web browser. You’ll see a “Hello World!” page .

Creating a Students details application


     You can create a students application by using  Some important modules are render_to_response and HttpResponse.  You can create this students application by editing view.py and urls.py using my source code in github. The link is Here.

Django model:

     In this example we use sqlite3 for handling  data. Django provides a range of options for storing data.  sqlite3 library used to connect SQLite database, retrieve some records, and feed them to a template for display as Web page.
First, we needed to take care of some initial configuration. we need to tell django which database server to use how to connect to it.
Edit settings.py as:
DATABASES = {
    'default': {
        'ENGINE': 'django.db.backends.sqlite3', # Add 'postgresql_psycopg2', 'postgresql', 'mysql', 'sqlite3' or 'oracle'.
        'NAME': '/home/recursivelab/djcode/students/student.db',                      # Or path to database file if using sqlite3.
        'USER': '',                      # Not used with sqlite3.
        'PASSWORD': '',                  # Not used with sqlite3.
        'HOST': '',                      # Set to empty string for localhost. Not used with sqlite3.
        'PORT': '',                      # Set to empty string for default. Not used with sqlite3.
    }
}  

DATABASE_NAME tells Django the name of your database.If you’re using SQLite, specify the full filesystem path to the database file on your filesystem  Does not change other things in this file. Once you've entered those settings and saved settings.py.
In shell, type these commands to test your database configuration:

>>> from django.db import connection
>>> cursor = connection.cursor()
If nothing happens, then your database is configured properly

Your students-App:

     Now it’s time to create a Django app – a bundle of Django code, including models and views, that lives together in a single Python package and represents a full Django application. Within the students project directory, type this command to create a student app:

python manage.py startapp student
It does create a books directory within the student directory. Let’s look at the contents of that directory:
student/
    __init__.py
    models.py
    tests.py
    views.py

Your model:

     The first step in using this database layout with Django is to express it as Python code. In the models.py file that was created by the startapp command, enter the following:
from django.db import models

class Students(models.Model):
    name = models.CharField(max_length=30)
    sex = models.CharField(max_length=15)
    age = models.CharField(max_length=10)
    mark = models.CharField(max_length=15)
It define the model of database. The first thing to notice is that each model is represented by a Python class that is a subclass of django.db.models.Model. We've written the code; now let’s create the tables in our database. In order to do that, the first step is to activate these models in our Django project. We do that by editing the settings.py file.It is looks like this:
MIDDLEWARE_CLASSES = (
    # 'django.middleware.common.CommonMiddleware',
    # 'django.contrib.sessions.middleware.SessionMiddleware',
    # 'django.contrib.auth.middleware.AuthenticationMiddleware',
)

INSTALLED_APPS = (
    # 'django.contrib.auth',
    # 'django.contrib.contenttypes',
    # 'django.contrib.sessions',
    # 'django.contrib.sites',
    'students.student',
)
Temporarily comment out all four of those strings by putting a hash character (#) in front of them. Comment out the default MIDDLEWARE_CLASSES setting, too.Then, add 'students.student' to the INSTALLED_APPS list.
Now that the Django app has been activated in the settings file, we can create the database tables in our database. First, let’s validate the models by running this command:

python manage.py validate
 If all is well, you’ll see the message 0 errors found.If your models are valid, run the following command for Django to generate CREATE TABLE statements for your models in the student app
python manage.py syncdb
Now the table is created.Finally run the command:

python manage.py runserver

The server is running at the address http://127.0.0.1:8000/, so open up a Web browser and go to http://127.0.0.1:8000/.

The full source code is available Here

Wednesday, March 6, 2013

Flask


      Flask is a lightweight web application framework written in Python. Flask is called a microframework because it keeps the core simple but extensible. Helps both for development and deployment of web applications. Flask depends on two external libraries, Werkzeug and Jinja2. Werkzeug is a toolkit for WSGI, the standard Python interface between web applications and a variety of servers for both development and deployment. Jinja2 renders templates. Flask application can test in local machine by using local server. Then finally you can deploy it on web server.This post gives a good introduction to Flask.

Installation:

Install flask in your local machine using the command:

sudo apt-get install python-flask

Simple App: Hello world

simple Flask application looks like this:

from flask import Flask
app = Flask(__name__)

@app.route('/')
def hello_world():
    return 'Hello World!'

if __name__ == '__main__':
    app.run() 

In this code first we imported the flask class.first argument is the name of the application's module.if you are using single module, you should use __name__. Next we create an instance of this class. we pass it the name of module. This is needed so that Flask knows where to look for templates, static files and soon. Then route() decorator is used to bind a function to URL

Just save it as hello.py and run with your Python interpreter. The local server is now running
$ python hello.py
    * Running on http://127.0.0.1:5000/

You should see your hello world message on http://127.0.0.1:5000/
To stop the server, use Control-C

STUDENTS APPLICATION IN FLASK

In this tutorial  we will create a simple web application 'student details'. The student details application provide you entering details of students and get back all data by sorting order by age and mark, also provide remove option and search option. We will use Flask and SQLite database with Python.

 Creating Folders


Before we get started, let’s create the folders needed for this application where we drop our files:
/students-app
       /static
       /templates

Tuesday, March 5, 2013

Google App Engine

   Google App Engine is a platform for developing and hosting web applications.App engine applications are easy to build, easy to maintain. You can build your application using Python, Java or Go environments. You just upload your application, and it's ready to serve to your users. With App Engine you write your application code, test it on your local machine and upload it to Google. You can create an account and publish an application that people can use right away at no charge from Google, and with no obligation. 
     This tutorial describes how to develop and deploy a simple Python 2.7 project with Google App Engine.  You can build web applications using the Python programming language,  and take advantage of the many libraries, tools and frameworks for Python.A Python web app interacts with the App Engine web server using the WSGI protocol, so apps can use any WSGI-compatible web application framework. App Engine includes a simple web application framework. Apps can use the App Engine Datastore for reliable, scalable persistent storage of data.Apps use the URL Fetch service to access resources over the web, and to communicate with other hosts using the HTTP and HTTPS protocols.
     For our App Engine implementation use Python 2.7v and use the python Software Development Kit(SDK).Download SDK for linux and extract it on your Home folder.You develop and upload Python applications for Google App Engine using the App Engine Python software development kit (SDK).

Let's begin by a simple 'Hello World!' application that show the message 'Hello World! in our browser.

STEP-1
 Create  a directory helloworld. all files for this application reside in this directory. create a file named helloworld.py

CQ40-Notebook-PC:~$ mkdir helloworld
CQ40-Notebook-PC:~$ cd helloworld/
CQ40-Notebook-PC:~/helloworld$ vi helloworld.py

Give the following content in it.

import webapp2

class MainPage(webapp2.RequestHandler):
  def get(self):
      self.response.headers['Content-Type'] = 'text/plain'
      self.response.write('Hello, webapp2 World!')

app = webapp2.WSGIApplication([('/', MainPage)],
                              debug=True)

This Python script responds to a request with an HTTP header that describes the content and the display Hello, world!. webapp2 is light weighted web frame work. This webapp2  has two parts a request handler and a WSGIApplication instants that route incoming request to handle based on URLs.

Friday, January 11, 2013

Pygame: Sierpinski triangle

    The Sierpinski triangle is a fractal described by Sierpiński in 1915 and appearing in Italian art from the 13th century. It is also called the Sierpiński gasket. The Sierpinski triangle is a  geometric pattern formed by connecting the  midpoints of the sides of a triangle. It is at the is most  interesting one and   simplest one in fractals.


The Sierpinski triangle is given by Pascal's triangle (mod 2), giving the sequence 1; 1, 1; 1, 0, 1; 1, 1, 1, 1; 1, 0, 0, 0, 1; ... . In other words, coloring all odd numbers black and even numbers white in Pascal's triangle produces a Sierpiński triangle


Construction
An algorithm for obtaining arbitrarily close approximations to the Sierpinski triangle is as follows:

Pygame: Koch Snowflake

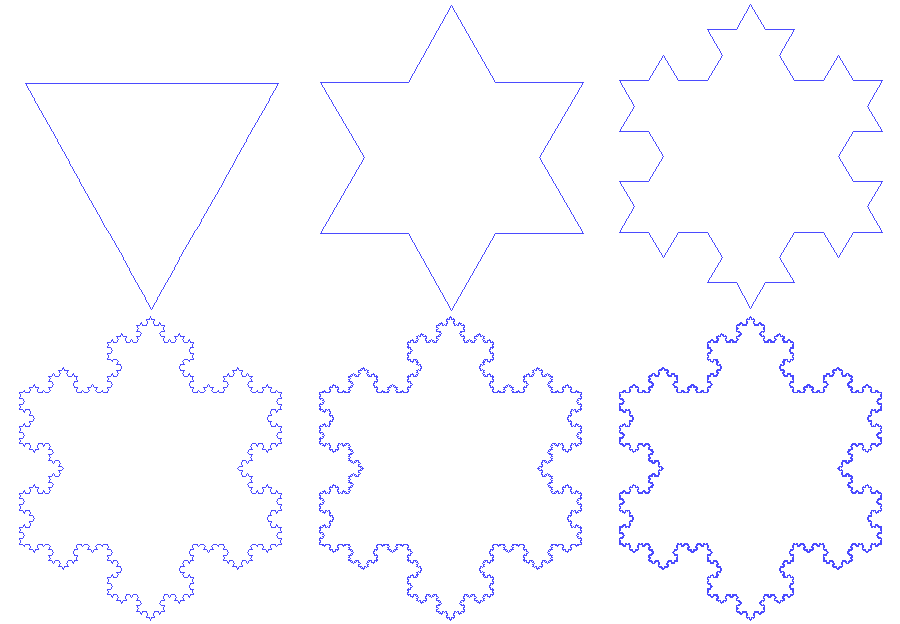
     A factral, also known as the Koch island, which was first described by Helge von Koch in 1904. It is built by starting with an equilateral triangle, removing the inner third of each side, building another equilateral triangle at the location where the side was removed, and then repeating the process indefinitely.
The Koch snowflake (also known as the Koch star and Koch island) is a mathematical curve and one of the earliest fractal curves to have been described.
Construction
The Koch snow flake can be constructed by starting with an equilateral triangle, then recursively altering each line segment as follows:

1. divide the line segment into three segments of equal length.
2. draw an equilateral triangle that has the middle segment from step 1 as its base and points outward.
3.remove the line segment that is the base of the triangle from step 2.
After one iteration of this process, the resulting shape is the outline of a hexagram.
The Koch snowflake is the limit approached as the above steps are followed over and over again. The Koch curve originally described by Koch is constructed with only one of the three sides of the original triangle. In other words, three Koch curves make a Koch snowflake.


   Start with an equilateral triangle T. Scale T by a factor of 1/3 and place 3 copies along each of the three sides of T as illustrated in the diagram below to form a new image S(1). Next scale T by a factor of 1/9 = (1/3)^2 and place 12=4*3 copies along the sides of T(1) as illustrated to form the image S(2). For the next iteration, take 48=4*12 copies of Tscaled by a factor of 1/27=(1/3)^3 and place them around the sides of S(2) to form the image S(3). Continue this construction. The Koch Snowflake is the limiting image of the construction.

Wednesday, January 9, 2013

Pygame: Game Of Life

Pygame:

    Pygame is a cross-platform set of Python modules designed for writing video games. It includes computer graphics and sound libraries designed to be used with the Python programming language. It is built over the Simple DirectMedia Layer (SDL) library. This is based on the assumption that the most expensive functions inside games (mainly the graphics part) can be abstracted from the game logic, making it possible to use a high-level programming language, such as Python, to structure the game.
    Pygame was originally written by Pete Shinners and is released under the open source free software GNU Lesser General Public License.

Game of life:

    The "game" is a zero-player game, meaning that its evolution is determined by its initial state, requiring no further input. One interacts with the Game of Life by creating an initial configuration and obseving how it evolves.

Rules:
    The universe of the Game of Life is an infinite two-dimensional orthogonal grid of square cells, each of which is in one of two possible states, alive or dead. Every cell interacts with its eight neighbours, which are the cells that are horizontally, vertically, or diagonally adjacent. At each step in time, the following transitions occur:
  1. Any live cell with fewer than two live neighbours dies, as if caused by under-population.
  2. Any live cell with two or three live neighbours lives on to the next generation.
  3. Any live cell with more than three live neighbours dies, as if by overcrowding.
  4. Any dead cell with exactly three live neighbours becomes a live cell, as if by reproduction.
The initial pattern constitutes the seed of the system. The first generation is created by applying the above rules simultaneously to every cell in the seed—births and deaths occur simultaneously, and the discrete moment at which this happens is sometimes called a tick (in other words, each generation is a pure function of the preceding one). The rules continue to be applied repeatedly to create further generations.
         I find the best way to understand the Pygame library is to jump straight into an example. In the early days of Pygame, I created The "Conway's game of life". Let's take a look at the code of Conway's game of life. This tutorial will go through the code block by block. Explaining how the code works.
Import modules:
This is the code that imports all the needed modules into your program. It also checks for the availability of some of the optional pygame modules.
import pygame,sys
from pygame.locals import *